Assalamualaikum,
Saat ini Saya akan mensharing bagaimana caranya membuat Server DNS Primary & Secondary , yang saya gunakan adalah Linux Debian 8.4 Jessie , ISPConfig 3 stable terbaru.
Baik kita langsung saja mulai….
Saya harap Anda memiliki 2 server yang bakal dibuat Server DNS dan 2 Buah IP Public, Server DNS Pertama kita beri alamat ns1.domainanda.com IP : 1.2.3.4 , Server DNS ke 2 ns2.domainanda.com IP: 1.2.3.5 .
Untuk server pertama ns1.domainanda.com silahkan ikutin panduan installasi ISPConfig 3 Debian Jessie disini , sampai dengan mau installasi ISPConfig 3 , tahan dan ikutin panduan berikut ini :
Kita buka Mysql/MariaDB
# mysql -u root -p
#
CREATE USER ‘root’@’1.2.3.5’ IDENTIFIED BY ‘passwordrootsqlanda’;
GRANT ALL PRIVILEGES ON * . * TO ‘root’@’1.2.3.5’ IDENTIFIED BY ‘passwordrootsqlanda’ WITH GRANT OPTION MAX_QUERIES_PER_HOUR 0 MAX_CONNECTIONS_PER_HOUR 0 MAX_UPDATES_PER_HOUR 0 MAX_USER_CONNECTIONS 0 ;
#
CREATE USER ‘root’@’ns1.domainanda.com’ IDENTIFIED BY ‘passwordrootsqlanda’;
GRANT ALL PRIVILEGES ON * . * TO ‘root’@’ns2.domainanda.com’ IDENTIFIED BY ‘passwordrootsqlanda’ WITH GRANT OPTION MAX_QUERIES_PER_HOUR 0 MAX_CONNECTIONS_PER_HOUR 0 MAX_UPDATES_PER_HOUR 0 MAX_USER_CONNECTIONS 0 ;
# FLUSH PRIVILEGES;
# quit;
Selanjutnya install ISPConfig diserver ns1.domainanda.com
# cd /tmp
# wget http://www.ispconfig.org/downloads/ISPConfig-3-stable.tar.gz
# tar xfz ISPConfig-3-stable.tar.gz
# cd ispconfig3_install/install/
# php -q install.php
Select language (en,de) [en]: <– ENTER
Installation mode (standard,expert) [standard]: <– expert
Full qualified hostname (FQDN) of the server, eg server1.domain.tld [ns1.domainanda.com]: <– ENTER
MySQL server hostname [localhost]: <– ENTER
MySQL root username [root]: <– ENTER
MySQL root password []: <– passwordrootsqlanda
MySQL database to create [dbispconfig]: <– ENTER
MySQL charset [utf8]: <– ENTER
Shall this server join an existing ISPConfig multiserver setup (y,n) [n]: <– ENTER
Adding ISPConfig server record to database.
Configure Mail (y,n) [y]: <– ENTER
Configuring Postfix
Generating a 2048 bit RSA private key
………………………………………………………………………………..+++
……………………..+++
writing new private key to ‘smtpd.key’
—–
You are about to be asked to enter information that will be incorporated
into your certificate request.
What you are about to enter is what is called a Distinguished Name or a DN.
There are quite a few fields but you can leave some blank
For some fields there will be a default value,
If you enter ‘.’, the field will be left blank.
—–
Country Name (2 letter code) [AU]: ID
State or Province Name (full name) [Some-State]: Provinsi Anda
Locality Name (eg, city) []: Kota Anda
Organization Name (eg, company) [Internet Widgits Pty Ltd]: Organisasi/institusi
Organizational Unit Name (eg, section) []: Unit IT
Common Name (eg, YOUR name) []: *.domainanda.com
Email Address []: <– ENTER
Configuring SASL
Configuring PAM
Configuring Courier
Configuring Spamassassin
Configuring Amavisd
Configuring Getmail
Stopping Postfix Mail Transport Agent: postfix.
Starting Postfix Mail Transport Agent: postfix.
Stopping SASL Authentication Daemon: saslauthd.
Starting SASL Authentication Daemon: saslauthd.
Stopping amavisd: amavisd-new.
Starting amavisd: amavisd-new.
Stopping ClamAV daemon: clamd.
Starting ClamAV daemon: clamd Bytecode: Security mode set to “TrustSigned”.
.
Stopping Courier authentication services: authdaemond.
Starting Courier authentication services: authdaemond.
Stopping Courier IMAP server: imapd.
Starting Courier IMAP server: imapd.
Stopping Courier IMAP-SSL server: imapd-ssl.
Starting Courier IMAP-SSL server: imapd-ssl.
Stopping Courier POP3 server: pop3d.
Starting Courier POP3 server: pop3d.
Stopping Courier POP3-SSL server: pop3d-ssl.
Starting Courier POP3-SSL server: pop3d-ssl.
Configure Jailkit (y,n) [y]: <– ENTER
Configuring Jailkit
Configure FTP Server (y,n) [y]: <– ENTER
Configuring Pureftpd
Restarting ftp server: Running: /usr/sbin/pure-ftpd-mysql-virtualchroot -l mysql:/etc/pure-ftpd/db/mysql.conf -l pam -Y 1 -8 UTF-8 -H -D -b -O clf:/var/log/pure-ftpd/transfer.log -E -u 1000 -A -B
Configure DNS Server (y,n) [y]: <– ENTER
Configuring BIND
Hint: If this server shall run the ISPConfig interface, select ‘y’ in the ‘Configure Apache Server’ option.
Configure Apache Server (y,n) [y]: <– ENTER
Configuring Apache
Configuring Vlogger
Configuring Apps vhost
Configure Firewall Server (y,n) [y]: <– ENTER
Configuring Firewall
Install ISPConfig Web Interface (y,n) [y]: <– ENTER
Installing ISPConfig
ISPConfig Port [8080]: <– ENTER
Enable SSL for the ISPConfig web interface (y,n) [y]: <– ENTER
Generating RSA private key, 4096 bit long modulus
…………………………………………………………………………………………………..++
…………………………….++
e is 65537 (0x10001)
You are about to be asked to enter information that will be incorporated
into your certificate request.
What you are about to enter is what is called a Distinguished Name or a DN.
There are quite a few fields but you can leave some blank
For some fields there will be a default value,
If you enter ‘.’, the field will be left blank.
—–
Country Name (2 letter code) [AU]: ID
State or Province Name (full name) [Some-State]: Provinsi
Locality Name (eg, city) []: Kota
Organization Name (eg, company) [Internet Widgits Pty Ltd]: Organisasi/Institusi
Organizational Unit Name (eg, section) []: Unit IT
Common Name (eg, YOUR name) []: *.domainanda.com
Email Address []: <– ENTER
Please enter the following ‘extra’ attributes
to be sent with your certificate request
A challenge password []: <– ENTER
An optional company name []: <– ENTER
writing RSA key
Configuring DBServer
Installing ISPConfig crontab
no crontab for root
no crontab for getmail
Restarting web server: apache2 … waiting .
Installation completed.
root@ns1:/tmp/ispconfig3_install/install#
Silahkan buka ISPConfig Anda dialamat https://ns1.domainanda.com:8080
Baik selanjutnya kita installasi di Sever DNS 2 yang berada dialamat , ns2.domainanda.com
# apt-get -y install ntp ntpdate
# apt-get -y install mariadb-client mariadb-server
# apt-get -y install php5-cli php5-mysql php5-mcrypt mcrypt
# apt-get -y install bind9 dnsutils
# apt-get install haveged
# cd /tmp
# wget http://www.ispconfig.org/downloads/ISPConfig-3-stable.tar.gz
# tar xfz ISPConfig-3-stable.tar.gz
# cd ispconfig3_install/install/
# php -q install.php
Select language (en,de) [en]: <– ENTER
Installation mode (standard,expert) [standard]: <– expert
Full qualified hostname (FQDN) of the server, eg ns1.domainanda.com [ns1.domainanda.com]: <– ENTER
MySQL server hostname [localhost]: <– ENTER
MySQL root username [root]: <– ENTER
MySQL root password []: <– yourrootsqlpassword
MySQL database to create [dbispconfig]: <– ENTER
MySQL charset [utf8]: <– ENTER
Shall this server join an existing ISPConfig multiserver setup (y,n) [n]: <– y
MySQL master server hostname []: <– ns1.domainanda.com
MySQL master server root username [root]: <– ENTER
MySQL master server root password []: <– passwordrootsqlanda_pada_ns1.domainanda.com
MySQL master server database name [dbispconfig]: <– nama_database_ISPconfig_anda_Pada_ns1.domainanda.com
Adding ISPConfig server record to database.
Configure Mail (y,n) [y]: <– n
Configure Jailkit (y,n) [y]: <– n
Configure FTP Server (y,n) [y]: <– n
Configure DNS Server (y,n) [y]: <– ENTER
Configuring BIND
Hint: If this server shall run the ISPConfig interface, select ‘y’ in the ‘Configure Apache Server’ option.
Configure Apache Server (y,n) [y]: <– n
Configure Firewall Server (y,n) [y]: <– ENTER
Configuring Firewall
Install ISPConfig Web Interface (y,n) [y]: <– n
Configuring DBServer
Installing ISPConfig crontab
no crontab for root
Installation completed.
root@ns2:/tmp/ispconfig3_install/install#
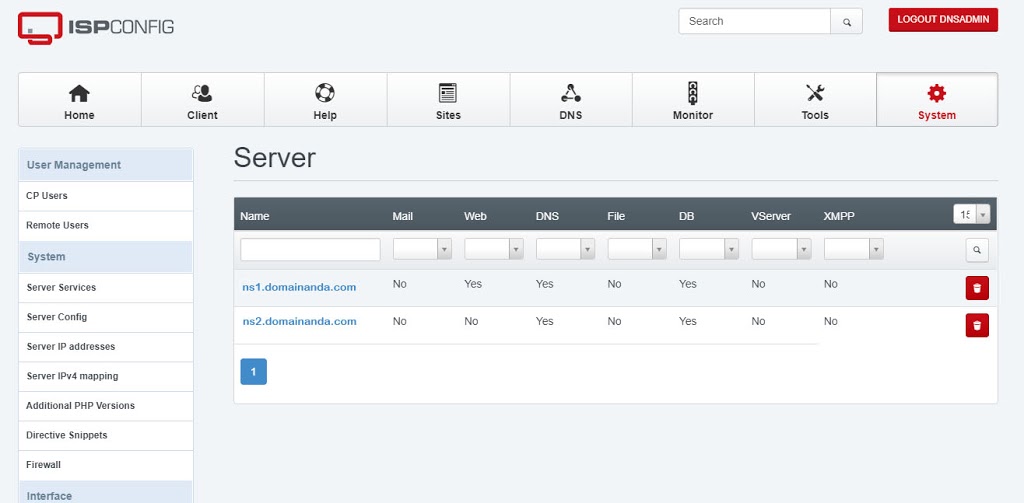
Selanjutnya buka ISPConfig pada https://ns1.domainanda.com:8080 , masuk ke menu System
Pastikan server ns1.domainanda.com dan ns2.domainanda.com sudah ada pada list Server
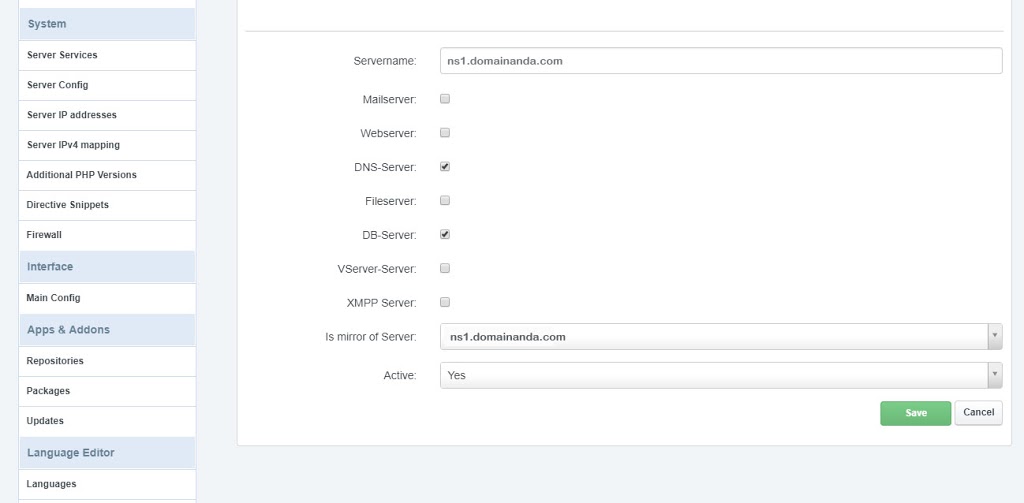
Kemudian klik server ns2.domainanda.com


Tidak ada Komentar